Make-Ahead Beef Pasties: Freeze & Reheat for Quick, Delicious Meals
Imagine this: a hearty, savory meal, encased in a golden, impossibly flaky crust, ready to be pulled from your freezer and enjoyed in minutes. Sounds like a dream, right? Well, it's a delicious reality with easy beef pasties. These portable pockets of comfort are not just incredibly satisfying; they are also a meal prep hero, designed for convenience without sacrificing flavor. Forget the days of complicated, labor-intensive pastries; this approach to beef pasties makes homemade achievable for everyone, turning humble ingredients into a truly unforgettable dish that fits perfectly into a busy lifestyle.
Hailing from the Upper Peninsula of Michigan, where they became a staple for miners, traditional pasties are the epitome of wholesome, stick-to-your-ribs fare. Our version brings that rich heritage into the modern kitchen, focusing on simplicity and that coveted "make-ahead" advantage. Whether you're new to the world of pastry or a seasoned baker looking for your next freezer-friendly favorite, get ready to fall in love with these irresistibly flaky and flavorful meat pies.
Crafting the Flaky Crust for Your Easy Beef Pasties
The foundation of any great pasty is its crust. Many home cooks are intimidated by homemade pastry, envisioning endless rolling and delicate handling. However, the secret to truly easy beef pasties lies in a forgiving and utterly delicious buttermilk pie crust that’s surprisingly simple to master. This particular crust, often made effortlessly in a food processor, transforms basic ingredients into a buttery, flaky dream.
Why a Food Processor Makes it Easy: Using a food processor minimizes handling, which is crucial for a tender crust. Cold butter is quickly pulsed with flour and buttermilk until coarse crumbs form, just beginning to clump. This method ensures the butter remains in small pieces, creating those signature flaky layers as it bakes. The buttermilk adds a subtle tang and helps create a wonderfully tender texture, making the dough incredibly easy to roll and shape—even for beginners.
- Keep it Cold: Always start with very cold butter and buttermilk. This prevents the butter from melting into the flour too quickly, preserving those essential pockets of fat for flakiness.
- Don't Overwork: Pulse just until the dough comes together. Overworking develops gluten, leading to a tough crust.
- Chill Time is Crucial: After forming disks, refrigerate the dough for at least an hour. This allows the gluten to relax and the butter to firm up, making it much easier to roll without sticking or tearing.
While store-bought crusts are an option for ultimate speed, we highly encourage trying this homemade buttermilk recipe. The difference in taste and texture is monumental, elevating your pasties from good to extraordinary. For those eager to master the art of homemade pastry, dive deeper into the nuances of achieving that perfect texture with Homemade Beef Pasties: Achieve Irresistibly Flaky & Savory Perfection.
The Savory Heart: Building Your Irresistible Pasty Filling
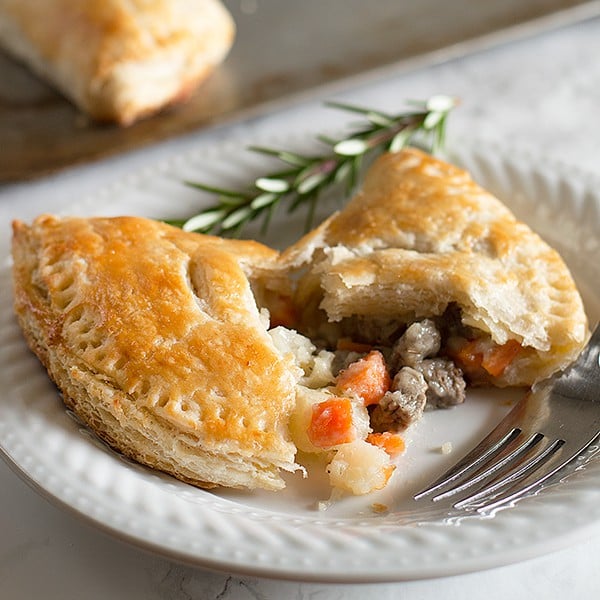
What truly defines easy beef pasties, beyond their incredible crust, is the rich and comforting filling. This isn't just ground beef stuffed into dough; it's a harmonious blend of savory flavors and tender textures, all bound together in a quick homemade gravy that makes every bite satisfying. The classic combination typically features ground beef, diced potatoes, carrots, and onions, but the beauty lies in its adaptability.
Pre-Cooking for Perfection: One of the key elements that sets this recipe apart, making it truly "easy," is the practice of fully cooking the filling before assembly. Many traditional pasty recipes rely on raw ingredients cooking inside the crust, which can sometimes lead to undercooked vegetables or an unevenly done filling. By browning your beef, adding your diced vegetables (carrots, potatoes, onions), and simmering them until tender, you eliminate any guesswork. This also allows the flavors to meld beautifully and ensures a consistent texture.
Once the beef and vegetables are cooked, a portion of the savory cooking liquid is used to create a simple, quick gravy thickened with a little flour and butter. Stirring this gravy back into the meat and vegetable mixture creates a moist, flavorful filling that won't dry out during baking. Remember to let the filling cool slightly before you begin assembly; hot filling can make your pastry dough difficult to work with and potentially lead to a soggy crust.
Ingredient Notes & Customization: While the core ingredients are fantastic on their own, don't hesitate to experiment:
- Vegetable Boost: Traditionalists often include rutabaga for a distinct earthy flavor. Peas, parsnips, or even corn can also be lovely additions. Just ensure all vegetables are diced into small, uniform pieces for even cooking.
- Seasoning: Beyond salt and pepper, consider a pinch of dried thyme, a bay leaf during simmering, or a dash of Worcestershire sauce to deepen the umami notes.
- Meat Variations: While beef is classic, a blend of beef and pork, or even lamb, can be used.
Mastering the Make-Ahead Magic: Freezing and Reheating Your Pasties
The true genius of easy beef pasties lies in their incredible freezer-friendly nature. This is where they transform from a delicious meal into a brilliant meal prep solution, saving you precious time on busy weeknights or providing a quick, satisfying lunch. The ability to freeze and reheat them flawlessly means you can make a large batch and have homemade goodness at your fingertips whenever hunger strikes.
How to Freeze Cooked Pasties: Once your pasties are baked to a golden-brown perfection and have cooled completely, they are ready for the freezer. This is the simplest and most recommended method for make-ahead convenience:
- Cool Completely: Ensure pasties are at room temperature. Freezing warm food can create condensation, leading to ice crystals and potential sogginess.
- Wrap Individually: For best results, wrap each pasty tightly in plastic wrap, then place them in an airtight freezer bag or container. This double-layer protection guards against freezer burn.
- Label and Date: Don't forget to label with the date. Properly stored, frozen pasties can last for up to 3 months.
Reheating for Instant Gratification: This is where the magic truly happens! Frozen pasties reheat beautifully, tasting just as fresh and delicious as if they had just come out of the oven. No thawing required:
- Microwave Method (Quickest): For a super-fast meal, place a frozen pasty directly into the microwave. Heat on high for 1-2 minutes, or until heated through. The crust may not be as crisp, but the filling will be piping hot and delicious.
- Oven Method (Crispiest): For that fresh-baked crispness, preheat your oven to 350°F (175°C). Place the frozen pasty directly on a baking sheet and bake for 20-30 minutes, or until the crust is golden and crisp, and the filling is hot. This method is ideal if you have a little more time and prefer a crunchy crust.
Imagine pulling a pasty from the freezer in the morning, taking it to work, and zapping it for a hearty lunch, or having a wholesome dinner ready with minimal effort after a long day. This make-ahead capability truly makes easy beef pasties a game-changer for efficient and delicious home cooking.
Tips for Success and Creative Variations
Making easy beef pasties is a rewarding culinary adventure, and a few expert tips can ensure your pasties turn out perfectly every time:
- Uniform Dicing: For the filling, ensure all your vegetables are diced to roughly the same size (about 1/4 to 1/2 inch cubes). This guarantees they cook evenly and contributes to a pleasant texture in every bite.
- Cool the Filling: As mentioned, let your savory filling cool down to at least room temperature before spooning it onto the pastry. Warm filling can melt the butter in your dough, making it sticky and difficult to work with, and potentially lead to a less flaky crust.
- Don't Overfill: While it's tempting to cram in as much delicious filling as possible, leave a good border (about 1 inch) around the edges of your dough. This makes it easier to fold and crimp securely without the filling oozing out.
- Secure Crimp: Use a fork or your fingers to firmly crimp the edges of the pasties. A well-sealed pasty prevents the filling from escaping during baking and ensures a beautiful, sealed pocket.
- Egg Wash for Gold: Before baking, brush the top of your pasties with an egg wash (one egg beaten with a tablespoon of water or milk). This gives them that beautiful, glossy golden-brown finish that makes them look as good as they taste.
- Experiment with Flavors: While the traditional beef and vegetable mix is a classic, feel free to get creative. Consider adding a touch of cheese (like cheddar or Monterey Jack) to the filling, or exploring different herb combinations such as fresh parsley or chives. A dash of hot sauce or red pepper flakes can also add a delightful kick!
- Serving Suggestions: Pasties are often enjoyed simply as is, but a dollop of ketchup or a side of extra gravy can elevate the experience. Some even enjoy them with a touch of mustard or their favorite hot sauce.
For more detailed step-by-step guidance on creating these wonderful savory pies from scratch, refer to Easy Beef Pasties: Beginner-Friendly Recipe for Flaky Perfection.
Conclusion
Embracing the world of easy beef pasties means unlocking a treasure trove of flavor, convenience, and culinary satisfaction. With a surprisingly simple, flaky buttermilk crust encasing a hearty, pre-cooked savory filling, these portable pies are more than just a meal; they're a smart solution for anyone seeking deliciousness on demand. Their incredible make-ahead capabilities and freezer-friendly nature ensure that a comforting, homemade meal is always just minutes away, making them perfect for busy families, meal prep enthusiasts, or anyone who loves the idea of wholesome food without the fuss. So, dare to try this delightful recipe, fill your freezer with these golden pockets of joy, and get ready to enjoy quick, delicious meals whenever the craving strikes!
