Homemade Beef Pasties: Achieve Irresistibly Flaky & Savory Perfection
Few comfort foods rival the hearty satisfaction of a perfectly baked pasty. Imagine a golden, buttery, impossibly flaky crust giving way to a rich, savory filling brimming with tender beef, earthy potatoes, sweet carrots, and aromatic onions, all bathed in a luscious, homemade gravy. If this description makes your mouth water, then get ready to discover how to make these incredible parcels of goodness right in your own kitchen. Making homemade beef pasties might sound like a daunting task, but we’re here to show you that achieving this level of culinary perfection is far more accessible than you think. In fact, our approach focuses on making
easy beef pasties that even novice bakers can master, ensuring a delicious and rewarding experience every time.
Originating from the mining regions of Cornwall, England, and famously adopted in Michigan’s Upper Peninsula, pasties (pronounced "PASS-tees") are more than just a meal; they're a piece of culinary history designed for portability and sustenance. While their heritage might be rich, their preparation doesn't have to be complicated. Forget any intimidation you might feel about working with pastry from scratch; this recipe is crafted to simplify the process without compromising on that coveted flaky texture and deep, satisfying flavor. Get ready to embark on a delightful baking adventure that promises truly irresistible results.
The Secret to an Irresistibly Flaky Crust: Buttermilk Pie Perfection
The cornerstone of any great pasty is its crust. A truly outstanding pasty boasts a shell that is not just tender, but audibly flaky and rich with buttery flavor. While store-bought pie crusts offer convenience, creating your own homemade version elevates your pasties to an entirely new level, and it’s surprisingly simple! Our go-to method for these
easy beef pasties utilizes a buttermilk pie crust, revered for its incredible tenderness and ease of handling.
What makes buttermilk pie crust so special? The buttermilk itself is key. Its acidity helps tenderize the gluten in the flour, resulting in a more delicate and less chewy crust. Paired with cold butter, which creates pockets of steam during baking, this combination guarantees that coveted flaky texture. And here's the best part: you can make this crust effortlessly in a food processor. This ingenious tool takes the guesswork and much of the mess out of pastry making. Simply pulse together flour, cold butter, and buttermilk until coarse crumbs form and just begin to clump. This minimal handling prevents overworking the dough, which is critical for flakiness.
Once formed, the dough is gently pressed into disks and chilled. This chilling period is non-negotiable; it allows the butter to firm up again and the gluten to relax, making the dough much easier to roll out without shrinking. Many home cooks, including those who’ve struggled with crusts before, find this buttermilk dough a game-changer. As one Allrecipes member, Jayelle, noted about a similar crust, "I have TERRIBLE luck with crusts and this was so easy." If you're looking for even more detailed guidance on mastering your pastry, you might find our article,
Easy Beef Pasties: Beginner-Friendly Recipe for Flaky Perfection, incredibly helpful for its step-by-step visuals and tips.
Crafting the Perfect Savory Filling: A Flavorful Foundation
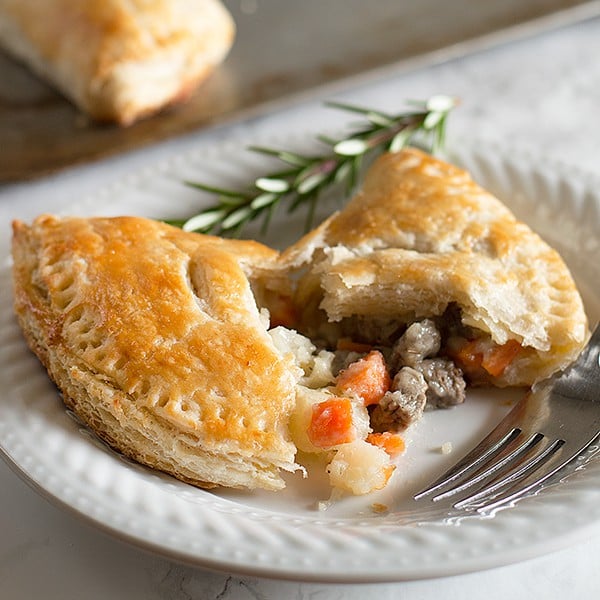
While the crust sets the stage, the filling is the heart of your pasty. For truly delicious
easy beef pasties, a robust and well-seasoned filling is paramount. Our recipe embraces the classic combination of diced beef, potatoes, carrots, and onions, all brought together in a quick, homemade gravy that binds the flavors beautifully.
Here’s where we diverge from some traditional pasty recipes and introduce a technique that significantly simplifies your baking and guarantees perfect results: pre-cooking the filling. Many pasty recipes require you to fill the raw dough with raw meat and vegetables, leaving you to worry about whether everything will cook through evenly in the oven. With our method, you brown the beef first, then add the diced vegetables and simmer them until tender. This ensures the meat is cooked, the vegetables are soft, and all the flavors have a chance to meld before they even touch the pastry. This eliminates any guesswork and guarantees a consistently delicious pasty every time.
The homemade gravy is another star of the show. After cooking your meat and vegetables, you’ll use some of the flavorful cooking liquid, thickened with a simple roux of butter and flour, to create a rich, savory gravy. This gravy is then stirred back into the beef and vegetables, coating every morsel with deliciousness. This pre-cooked, saucy filling not only tastes incredible but also helps to prevent a dry pasty.
While the traditional ingredients are fantastic, don't hesitate to customize your filling. Feel free to incorporate other root vegetables like parsnips or rutabagas (a true traditional pasty ingredient!), or add a handful of frozen peas or corn for extra color and sweetness. The key is to keep all ingredients diced roughly the same size to ensure even cooking and distribution within each pasty. Allow your filling to cool slightly before assembling; this prevents the hot mixture from melting the butter in your delicate pastry dough.
Step-by-Step Guide to Assembling & Baking Your Pasties
With your flaky dough chilled and your savory filling cooled, it’s time for the exciting part: assembly! This process for making
easy beef pasties is straightforward and incredibly rewarding.
1. Prepare the Dough: Take your chilled dough disks from the refrigerator. On a lightly floured surface, divide each disk into three equal pieces. Roll each piece into a roughly 7-8 inch circle. Don’t worry about perfection; rustic charm is part of the pasty appeal!
2. Fill the Pasties: Place a generous scoop (about ½ to ¾ cup) of your cooled beef and vegetable filling onto one half of each dough circle, leaving a clear border around the edge. Make sure not to overfill, as you need space to seal them.
3. Fold and Crimp: Gently fold the empty half of the dough over the filling, aligning the edges to form a semi-circle. Press the edges together firmly with your fingers to seal. For that classic pasty look and extra secure seal, use the tines of a fork to crimp all around the sealed edge. This creates a beautiful, rustic pattern and ensures no precious gravy escapes during baking.
4. Egg Wash and Bake: Transfer your assembled pasties to a baking sheet lined with parchment paper. For a beautiful golden-brown finish and a slight sheen, lightly brush the tops of each pasty with an egg wash (one egg beaten with a tablespoon of water or milk). You can also sprinkle a pinch of coarse salt on top for added texture and flavor. Bake in a preheated oven (typically around 375-400°F or 190-200°C) until they are deeply golden brown and the crust is crisp. The exact baking time will vary, but usually, it's around 30-40 minutes.
Tips for Pasty Perfection & Make-Ahead Magic
*
Don't Skimp on Chilling: Both the dough and the cooled filling are crucial for success. Warm dough is sticky and hard to work with; hot filling will melt your butter and make your crust soggy.
*
Uniform Dicing: Try to dice your beef and vegetables into roughly ½-inch pieces. This ensures even cooking and a pleasant texture in every bite.
*
Venting: While not strictly necessary with a pre-cooked filling, you can cut a small slit or two in the top of each pasty before baking to allow steam to escape. This can help prevent cracks and ensure an extra crisp crust.
*
Serving Suggestions: While pasties are often enjoyed plain, they are also delicious with a dollop of ketchup, a side of extra gravy, or even a simple fresh salad to cut through the richness.
One of the most incredible aspects of homemade pasties is their freezer-friendliness. These
easy beef pasties are fantastic for meal prepping! You can assemble and bake them, let them cool completely, then wrap them individually and freeze. When a craving strikes, simply pull one out of the freezer and reheat it in the microwave or oven until piping hot. They taste just as delicious as when they were freshly baked, making them an ideal solution for quick lunches or dinners. For comprehensive advice on how to store, freeze, and reheat your pasties to perfection, be sure to check out our dedicated guide:
Make-Ahead Beef Pasties: Freeze & Reheat for Quick, Delicious Meals.
Conclusion
There’s a profound satisfaction that comes from creating something truly delicious from scratch, especially when it’s as comforting and flavorful as a homemade beef pasty. By following these simple steps and embracing the tips for our
easy beef pasties, you'll be able to create a culinary masterpiece with an irresistibly flaky crust and a deeply savory filling. Whether you're making them for a family meal, a grab-and-go lunch, or to stock your freezer, these pasties are sure to become a cherished recipe in your repertoire. So, roll up your sleeves, gather your ingredients, and get ready to impress yourself and everyone lucky enough to share in these delectable pockets of perfection.