Easy Beef Pasties: Your Beginner-Friendly Guide to Flaky Perfection
Imagine a golden-brown, handheld pastry, its buttery, flaky crust giving way to a rich, savory filling of tender beef, hearty potatoes, sweet carrots, and aromatic onions simmered in a luscious homemade gravy. This isn't just a fantasy; it's the delicious reality of a classic beef pasty, and guess what? Making them from scratch is far easier than you might think! Often hailed as the ultimate comfort food, especially in regions like Michigan's Upper Peninsula where they're a culinary icon with Cornish roots, pasties can seem intimidating. But fear not, aspiring home cooks! This recipe for
easy beef pasties is specifically designed to guide beginners to absolute success, ensuring an irresistibly flaky and flavorful experience every single time.
Forget those complex, multi-step baking projects. We're here to demystify the art of pasty making, proving that achieving that perfect balance of crisp pastry and melt-in-your-mouth filling is entirely within your grasp. Whether you're looking for a hearty weeknight dinner, a satisfying packed lunch, or a make-ahead meal that freezes beautifully, these beef pasties are about to become your new favorite go-to.
What Makes These Beef Pasties So Easy and Perfect for Beginners?
The idea of making meat pies from scratch can conjure images of wrestling with delicate dough and worrying about undercooked fillings. However, this particular recipe for
easy beef pasties tackles these common hurdles head-on, making it incredibly beginner-friendly.
First and foremost, the magic starts with the pastry crust. We utilize a brilliant buttermilk pie crust that is not only forgiving but also incredibly simple to prepare, especially with the help of a food processor. This method minimizes handling, which is crucial for a tender, flaky crust, and ensures a consistent texture without the usual fuss and mess of traditional hand-mixing. You'll find this dough remarkably easy to roll out and shape, even if you're a complete novice to pie crusts.
Secondly, a common concern with stuffed pastries is ensuring the filling is fully cooked. This recipe smartly addresses that by having you cook the savory beef and vegetable mixture *before* it goes into the pastry shell. This eliminates any guesswork, allowing you to confirm your meat is tender and your vegetables are perfectly softened well before baking. This pre-cooked filling approach means less time in the oven and more certainty that your pasty will be cooked through to perfection, delivering maximum flavor and peace of mind.
The Secret to Flaky Perfection: Mastering Your Pastry Crust
A pasty is only as good as its crust, and the secret to an outstanding one lies in achieving that desired flaky, buttery texture. While some recipes might rely on store-bought crusts for convenience (and that's always an option if you're truly short on time!), we highly recommend trying this buttermilk pie crust. It's so easy to work with and yields a superior result that truly elevates your
easy beef pasties.
Here's why this buttermilk crust shines:
*
Buttermilk Power: The acidity in buttermilk works wonders, helping to tenderize the dough and contribute to a more tender and flaky texture. It also adds a subtle tang that complements the savory filling beautifully.
*
Cold Butter is Key: Using very cold, diced butter is fundamental for flakiness. As the butter melts in the oven, it creates pockets of steam, which separate the layers of dough, resulting in that irresistible flaky texture.
*
Food Processor Simplicity: Pulsing together flour, cold butter, and buttermilk in a food processor takes mere minutes. It ensures the butter is evenly distributed in small pieces without overworking the dough, preventing a tough crust. The goal is coarse crumbs that just begin to clump, indicating ideal hydration.
*
Minimal Handling: The less you handle the dough, the more tender your crust will be. Overworking develops gluten, leading to a tough pastry. The food processor and the chilling step help maintain this delicate balance.
After forming your dough into disks, a crucial refrigeration period of at least an hour (or even overnight!) is necessary. This allows the gluten to relax, making the dough easier to roll out, and firms up the butter, further contributing to that desired flakiness. If you're looking to truly hone your pastry skills, there are many detailed tutorials available, often with step-by-step pictures, that focus entirely on mastering this versatile dough.
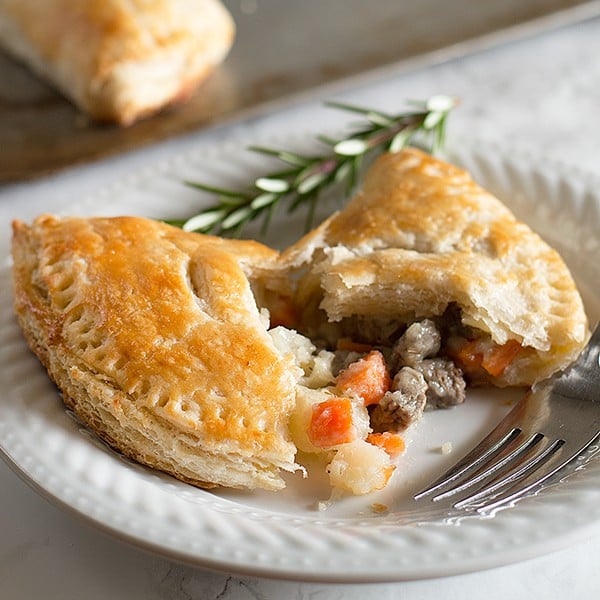
Crafting the Irresistible Savory Filling
While the crust sets the stage, the savory filling is the heart of your
easy beef pasties. This recipe keeps things wonderfully simple yet incredibly flavorful, focusing on classic ingredients that create a comforting and hearty experience.
The core components are:
*
Ground Beef: Lean ground beef is ideal. Browning it thoroughly before adding other ingredients is essential for developing deep, rich flavors through the Maillard reaction.
*
Classic Vegetables: Diced potatoes, carrots, and onions form the traditional base. These vegetables not only add flavor and texture but also provide essential nutrients, making each pasty a wholesome meal. Ensure your vegetables are diced uniformly so they cook evenly.
*
Homemade Gravy: This is where the magic happens! After cooking the beef and vegetables, a portion of the savory cooking liquid is combined with a roux (butter and flour) to create a quick, robust gravy. This gravy binds the filling together, ensuring every bite is moist, flavorful, and incredibly satisfying.
*
Seasoning: Simple salt and pepper are often all you need, but feel free to experiment with a pinch of dried thyme, sage, or a bay leaf during the simmering process to add more depth.
While the traditional filling is perfect as is, feel free to customize it to your liking! This recipe sparks creativity, allowing home cooks to adapt fillings based on preference or what's in season. Consider adding other root vegetables like diced rutabaga (a true traditional pasty ingredient, especially from the Upper Peninsula!), parsnips, or even a handful of frozen peas or corn towards the end of cooking for extra color and sweetness. Just ensure any additions are diced to a similar size as the potatoes and carrots for even cooking.
Step-by-Step Guide to Assembling and Baking Your Pasties
With your chilled dough and cooled, savory filling ready, it's time for the exciting part: assembly! This process is straightforward, even for first-timers.
1.
Prepare the Dough: Divide each chilled dough disk into 3 equal pieces. On a lightly floured surface, roll each piece into a roughly 6-7 inch circle. Aim for an even thickness, about 1/8 inch, which will ensure a flaky yet sturdy crust.
2.
Fill 'er Up: Spoon a generous amount of your slightly cooled beef and vegetable filling onto one half of each dough circle, leaving about a 1/2 to 3/4 inch border around the edge. Make sure the filling isn't too hot, as this can make the dough difficult to handle and lead to a soggy bottom.
3.
Fold and Crimp: Fold the other half of the dough over the filling, creating a crescent shape. Gently press down around the edges to seal the pasty. Then, use the tines of a fork to firmly crimp the edges closed, creating a decorative and secure seal that prevents the filling from escaping during baking.
4.
Egg Wash for Golden Glow: For that beautiful, appetizing golden-brown finish and a touch of shine, brush the tops of your assembled pasties with an egg wash (typically one egg beaten with a tablespoon of water or milk). This also helps create a slightly crispier crust. Alternatively, for a slightly less shiny but still golden result, you can rub them with a little milk before baking, a tip often used for traditional pasties.
5.
Bake to Perfection: Place the pasties on a baking sheet lined with parchment paper. Bake in a preheated oven until they are deeply golden brown and the crust is visibly flaky. The pre-cooked filling means you're primarily baking the crust to perfection.
FAQs and Pro Tips for Pasty Perfection
Here are some common questions and helpful tips to ensure your pasty-making journey is a delicious success:
Can you freeze pasties?
Absolutely! One of the most beloved features of pasties is how incredibly well they freeze and reheat, making them an ideal make-ahead meal solution. Whether you want to prepare them for busy weeknights or have quick lunches on hand, freezing pasties is a game-changer. You can freeze them baked or unbaked. For optimal results, wrap individual pasties tightly in plastic wrap and then place them in an airtight freezer bag. When ready to enjoy, simply pull one out of the freezer. For more detailed instructions on how to best preserve and reheat your delicious creations, check out our guide on
Make-Ahead Beef Pasties: Freeze & Reheat for Quick, Delicious Meals.
How do you reheat frozen pasties?
*
Microwave: For a quick fix, microwave a frozen pasty for 1-2 minutes until sizzling hot. The crust may be softer, but it will still be delicious.
*
Oven: For best results and to regain that crisp, flaky crust, reheat pasties in a preheated oven at 350°F (175°C) for 20-30 minutes, or until heated through and golden.
What to serve with pasties?
Pasties are a complete meal on their own! However, they pair wonderfully with a side of ketchup (a popular choice in the Upper Peninsula!), a dollop of extra gravy, or a simple green salad to balance the richness.
Pro Tip: Cooling the Filling
Ensure your beef and vegetable filling is cooled completely (or at least to room temperature) before assembling the pasties. Warm filling can melt the butter in your pastry dough, making it sticky and difficult to work with, and can lead to a soggy bottom crust.
Pro Tip: Don't Overfill
While it's tempting to cram in as much delicious filling as possible, overfilling your pasties can lead to burst seams during baking. Stick to the recommended amount to ensure a perfect seal and prevent leaks. For even more insights into achieving that perfect savory pie, explore our article on
Homemade Beef Pasties: Achieve Irresistibly Flaky & Savory Perfection.
Conclusion
There you have it – the comprehensive, beginner-friendly guide to creating mouthwatering
easy beef pasties right in your own kitchen. From mastering the simple buttermilk crust to crafting the rich, savory filling, every step is designed for success. No longer do you need to be intimidated by the idea of homemade meat pies. With a little guidance and these straightforward instructions, you can produce a batch of irresistibly flaky, flavorful pasties that will impress everyone at your table and nourish your soul. So, roll up your sleeves, embrace the joy of baking, and get ready to savor the delightful taste of your very own homemade beef pasties!